It is highly recommended to install OpenBh 5.2 onto your Vu+ 4K box, and just setup the basic features (image resolution, network connection and set a password in telnet etc, you do not need to setup tuners as they will not be used) but not to install ANYTHING else into the image as it is best to keep the installation as small as possible.
This image will be the "base" aka Recovery image for your box.
It should NOT be used for daily use or viewing tv as it is purely for setting up the Vu+ Multiboot environment, and the only other time you should need to use the Recovery image, is if you manage to mess something up and your box will no longer boot.
Once you have completed the 1st setup, make sure you mount your hdd and usb sticks (if you have them).
After rebooting the box, press Menu and go to the Shutdown / Restart option.
Select Enable Vu+ Multiboot, press the Green button to confirm and your box should reboot within 10 seconds.
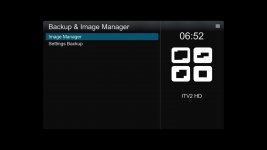
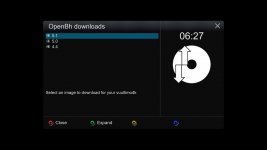
Once rebooted, you can go to image manager (Menu - Backup & Image Manager - Image Manager and then Image Download (Yellow button) and then Download OpenBh 5.2 for your box (or you can upload the zip file you have already downloaded to flash the box with if you flashed in the traditional way with a usb stick to /media/hdd/imagebackups).
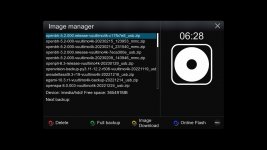
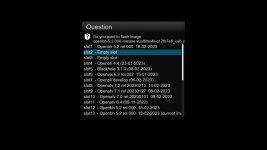
Once the image is downloaded, select it in image manager and it will ask you which slot you want to install it on (1, 2 or 3).
These are the multiboot flash slots and can be used for any images you wish to install (for this guide we will select slot 1).
When you have selected the slot (in this case slot 1), ofgwrite will then flash the chosen slot with the downloaded OpenBh 5.2 image.
After installation, the box will reboot and startup in Slot 1.
You now setup the image and use it as you normally would.
If you wish to install a 2nd image, then repeat the steps above, download (or upload to /media/hdd/imagebackups) your chosen image and in image manager choose slot 2 (or slot 3).
The chosen image will then be installed in the selected slot.
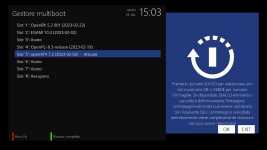
To switch between images, just go to Menu - Shutdown / Restart - Multiboot Selector and it will show you the currently installed images, and you just highlight the one you wish to boot and press the OK button, your box will then reboot to the image selected.
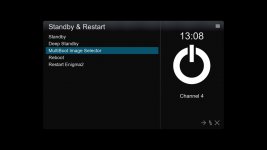
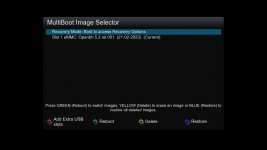
If you have a USB stick mounted on the box and require more than 3 extra images, then you can go to Menu - Shutdown / Restart - Multiboot Selector and press the Red button, this will add 4 extra slots on your USB stick (there is no limit, atleast not that we have managed to reach in testing) as to how many slots you can have, other than the size of your usb stick being the limitation, in theory 1million+ images could be installed if you so wish, Please note that the USB stick must be formatted Ext4.
Once the extra slots are created your box will restart, then you can go to Image Manager as above and select any of the slots that are available to add extra images too.
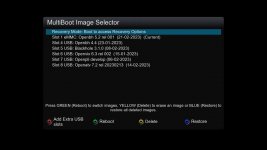
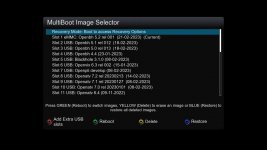
RECOVERY MODE...
If for any reason you need to get into the Recovery image, then go to Menu - Shutdown / Restart - Multiboot Selector - Recovery Mode and your box will reboot to the Recovery Image (aka slot 0).
Then you can ftp into your box and try to fix whatever issue you have created.

Emergency RECOVERY...
Should you manage to mess something up, and your box will no longer boot at all, then you can add a file called STARTUP_RECOVERY (a blank file with the stated name will do) and put this onto a USB stick, insert it into the box and power it off and back on (no need to remove any other usb sticks connected), once the Recovery image has booted, you must remove the usb stick, otherwise you will not be able to boot another image.
Important Notes:
IF you decide for any reason to reflash your box (because you no longer require Multiboot for example), or because you want to update to another image for any reason, you will wipe ALL images installed in flash (eMMC) on your box, so if you have all 3 slots in use, they will all be wiped.
If you have 2 or 3 images installed in flash and you decide for any reason you no longer want them all in flash, you must delete the linuxrootfs2 or linuxrootfs3 folder from your box manually, otherwise the free space will not be recovered (if you just want to reflash 1 of the slots, then this will be done automatically).
Some images will not boot if the image is not installed in flash (openatv 6.4 and below or images based on these), they must be in 1 of the 3 flash (eMMC) slots.
Not all images will support Multiboot, as it has never been an option until now.
If you install an image that does not have a Multiboot menu, then you will need to use the Emergency Recovery option to boot to Recovery Mode, and then chose the image you wish to boot from there (remember to remove the usb stick once Recovery Mode has booted).
We hope that other images teams, will add the Vu+ Multiboot, so all current and future images will be supported, but it is out of our hands (please ask them to make the required changes, we will not be modifying files to make this work on other images).
Some images installed on a USB stick will not show picons, again some images need updates for this to work.
Some images installed on a USB will not have a full backup option, the image devs of those images will need to update the images to support this.
If you install an OpenBh 5.1 image then you will need to install the attached openbh5-1-vu-multiboot_1-0_cortexa15hf-neon-vfpv4-ipk
If you install an OpenBh 5.0 image then you will need to install the attached openbh5-0-vu-multiboot_1-0_cortexa15hf-neon-vfpv4-ipk (note that if you install an image onto a usb stick with OpenBh5.0 then you will need to manually move it on the usb stick into the boxmodel folder.
If you install an OpenATV 6.4 image, then you will need to use the attached ATV6.4_Multiboot.py (rename it to just Multiboot.py) and manually install it to /usr/lib/enigma2/python/Tools when you have your openatv6.4 image booted (you will need to restart E2 for it to work).
If you install an OpenATV 7.x image, then you will need to use the attached ATV7.x_Multiboot.py (rename it to just Multiboot.py) and manually install it to /usr/lib/enigma2/python/Tools when you have your openatv7.x image booted (you will need to restart E2 for it to work).
If you install an OpenPLi image, then you will need to use the attached OpenPLi_Multiboot.py (rename it to just Multiboot.py) and manually install it to /usr/lib/enigma2/python/Tools when you have your openpli image booted (you will need to restart E2 for it to work).
If you install an OpenBh 4.4 or older or a BH image, then use the attached Multiboot old Bh and Obh images.zip file (thx to Mx10)
No files need to be modified or manually installed if you install an OpenViX 6.3.003 image or above.
If you would rather not fill up your flash space with extra images, it is possible to edit the STARTUP_2 and STARTUP_3 files, and instead point them to your usb stick, meaning just the Recovery Image + 1 other image in Slot 1 will remain in the flash.
If you want to install Blackhole 3.1.0 (or your BH 3.1.0 backup) on your Solo4K you need to repack the image with the file BH Solo4K kernel_auto.bin. Download it,, unzip the image, replace the original kernel_auto.bin. Zip it again and flash it from openbh image manager.
This image will be the "base" aka Recovery image for your box.
It should NOT be used for daily use or viewing tv as it is purely for setting up the Vu+ Multiboot environment, and the only other time you should need to use the Recovery image, is if you manage to mess something up and your box will no longer boot.
Once you have completed the 1st setup, make sure you mount your hdd and usb sticks (if you have them).
After rebooting the box, press Menu and go to the Shutdown / Restart option.
Select Enable Vu+ Multiboot, press the Green button to confirm and your box should reboot within 10 seconds.
Once rebooted, you can go to image manager (Menu - Backup & Image Manager - Image Manager and then Image Download (Yellow button) and then Download OpenBh 5.2 for your box (or you can upload the zip file you have already downloaded to flash the box with if you flashed in the traditional way with a usb stick to /media/hdd/imagebackups).


Once the image is downloaded, select it in image manager and it will ask you which slot you want to install it on (1, 2 or 3).
These are the multiboot flash slots and can be used for any images you wish to install (for this guide we will select slot 1).
When you have selected the slot (in this case slot 1), ofgwrite will then flash the chosen slot with the downloaded OpenBh 5.2 image.
After installation, the box will reboot and startup in Slot 1.
You now setup the image and use it as you normally would.
If you wish to install a 2nd image, then repeat the steps above, download (or upload to /media/hdd/imagebackups) your chosen image and in image manager choose slot 2 (or slot 3).
The chosen image will then be installed in the selected slot.
To switch between images, just go to Menu - Shutdown / Restart - Multiboot Selector and it will show you the currently installed images, and you just highlight the one you wish to boot and press the OK button, your box will then reboot to the image selected.


If you have a USB stick mounted on the box and require more than 3 extra images, then you can go to Menu - Shutdown / Restart - Multiboot Selector and press the Red button, this will add 4 extra slots on your USB stick (there is no limit, atleast not that we have managed to reach in testing) as to how many slots you can have, other than the size of your usb stick being the limitation, in theory 1million+ images could be installed if you so wish, Please note that the USB stick must be formatted Ext4.
Once the extra slots are created your box will restart, then you can go to Image Manager as above and select any of the slots that are available to add extra images too.


RECOVERY MODE...
If for any reason you need to get into the Recovery image, then go to Menu - Shutdown / Restart - Multiboot Selector - Recovery Mode and your box will reboot to the Recovery Image (aka slot 0).
Then you can ftp into your box and try to fix whatever issue you have created.

Emergency RECOVERY...
Should you manage to mess something up, and your box will no longer boot at all, then you can add a file called STARTUP_RECOVERY (a blank file with the stated name will do) and put this onto a USB stick, insert it into the box and power it off and back on (no need to remove any other usb sticks connected), once the Recovery image has booted, you must remove the usb stick, otherwise you will not be able to boot another image.
Important Notes:
IF you decide for any reason to reflash your box (because you no longer require Multiboot for example), or because you want to update to another image for any reason, you will wipe ALL images installed in flash (eMMC) on your box, so if you have all 3 slots in use, they will all be wiped.
If you have 2 or 3 images installed in flash and you decide for any reason you no longer want them all in flash, you must delete the linuxrootfs2 or linuxrootfs3 folder from your box manually, otherwise the free space will not be recovered (if you just want to reflash 1 of the slots, then this will be done automatically).
Some images will not boot if the image is not installed in flash (openatv 6.4 and below or images based on these), they must be in 1 of the 3 flash (eMMC) slots.
Not all images will support Multiboot, as it has never been an option until now.
If you install an image that does not have a Multiboot menu, then you will need to use the Emergency Recovery option to boot to Recovery Mode, and then chose the image you wish to boot from there (remember to remove the usb stick once Recovery Mode has booted).
We hope that other images teams, will add the Vu+ Multiboot, so all current and future images will be supported, but it is out of our hands (please ask them to make the required changes, we will not be modifying files to make this work on other images).
Some images installed on a USB stick will not show picons, again some images need updates for this to work.
Some images installed on a USB will not have a full backup option, the image devs of those images will need to update the images to support this.
If you install an OpenBh 5.1 image then you will need to install the attached openbh5-1-vu-multiboot_1-0_cortexa15hf-neon-vfpv4-ipk
If you install an OpenBh 5.0 image then you will need to install the attached openbh5-0-vu-multiboot_1-0_cortexa15hf-neon-vfpv4-ipk (note that if you install an image onto a usb stick with OpenBh5.0 then you will need to manually move it on the usb stick into the boxmodel folder.
If you install an OpenATV 6.4 image, then you will need to use the attached ATV6.4_Multiboot.py (rename it to just Multiboot.py) and manually install it to /usr/lib/enigma2/python/Tools when you have your openatv6.4 image booted (you will need to restart E2 for it to work).
If you install an OpenATV 7.x image, then you will need to use the attached ATV7.x_Multiboot.py (rename it to just Multiboot.py) and manually install it to /usr/lib/enigma2/python/Tools when you have your openatv7.x image booted (you will need to restart E2 for it to work).
If you install an OpenPLi image, then you will need to use the attached OpenPLi_Multiboot.py (rename it to just Multiboot.py) and manually install it to /usr/lib/enigma2/python/Tools when you have your openpli image booted (you will need to restart E2 for it to work).
If you install an OpenBh 4.4 or older or a BH image, then use the attached Multiboot old Bh and Obh images.zip file (thx to Mx10)
No files need to be modified or manually installed if you install an OpenViX 6.3.003 image or above.
If you would rather not fill up your flash space with extra images, it is possible to edit the STARTUP_2 and STARTUP_3 files, and instead point them to your usb stick, meaning just the Recovery Image + 1 other image in Slot 1 will remain in the flash.
If you want to install Blackhole 3.1.0 (or your BH 3.1.0 backup) on your Solo4K you need to repack the image with the file BH Solo4K kernel_auto.bin. Download it,, unzip the image, replace the original kernel_auto.bin. Zip it again and flash it from openbh image manager.
Attachments
-
openbh5.1-vu+multiboot_1.0_cortexa15hf-neon-vfpv4.ipk375 KB · Views: 186
-
OpenATV_7.x.MultiBoot.zip6.5 KB · Views: 271
-
OpenPLi-Multiboot.zip2 KB · Views: 216
-
openbh5.0-vu+multiboot_1.0_cortexa15hf-neon-vfpv4.ipk357.8 KB · Views: 84
-
Multiboot old Bh and Obh images.zip7.7 KB · Views: 169
-
OpenATV6.4_MultiBoot.zip3.7 KB · Views: 107
-
BH Solo4K kernel_auto.bin.zip3.9 MB · Views: 77
-
STARTUP_RECOVERY.zip166 bytes · Views: 181

